As humans, we become more focused and goal-oriented when we have a schedule to follow. Think about school or university, for example. Everyone has individual schedules, right?
The same goes for project management.
A project schedule gives you a realistic timeline of activities, milestones, deadlines, stakeholders, etc. Effective project scheduling lets you set a clear path for project execution.
Now that we are familiar with the basics let’s dive deeper. This blog will take you to the intricacies of scheduling in project management, its benefits, examples, and more.
Let’s get it started.
What Is Project Scheduling?
Project scheduling outlines the sequence of tasks, milestones, and resources required to complete a project within a specific timeframe. It’s the backbone of project management because it provides a clear roadmap of what needs to be done, when, and by whom.
What Is Project Management? How to Manage Projects Online With ProProfs Project
With a detailed project schedule, you can monitor how resources are utilized as the project unfolds. Since the tasks are lined up in a definite sequence, it becomes easy to monitor real-time progress effortlessly.
So, in a way, a schedule gives you instant insight into –
- Which tasks need to be taken up and when?
- Which resources are assigned to a particular task?
- What are the start and end dates for various project tasks and activities?
- Which tasks should be prioritized?
- Which tasks are interdependent?
What Are the Types of Schedules in Project Management?
Project management scheduling isn’t a one-size-fits-all approach. Different types of schedules serve various purposes depending on the project’s complexity, duration, and requirements.
Let’s explore the three main types of project schedules –
1. The Master Schedule
The master project schedule provides a high-level overview of the entire project. It outlines the primary tasks and milestones without digging much into the minute details.
However, this type of schedule isn’t suitable for tracking day-to-day activities. It’s useful only when sharing the big-picture progress with stakeholders rather than task-level details.
For example, in a marketing campaign, a master project schedule might include milestones like “Content Draft Approval” or “Campaign Launch,” but it won’t list daily content revisions or design iterations.
2. The Milestone Schedule (Summary Schedule)
A milestone or summary schedule is more detailed than a master schedule but still not as granular as a task-level breakdown. This type of schedule is effective when you need to track the completion of key project phases without getting bogged down by small tasks.
In a recent website redesign project, our milestone schedule included deliverables such as completing wireframes, approving the visual design, and deploying the new website.
These helped us ensure that the core objectives were being met on time while leaving room for flexibility in daily operations.
3. The Detailed Project Schedule
A detailed project schedule lists every task, along with its start and finish dates, resources, dependencies, and potential risks.
This is the go-to schedule when managing complex projects because it lets you track every step meticulously. Detailed schedules are indispensable for large projects with many moving parts.
One example from a past project that comes to my mind is a system migration project where every minor task, from server setup to testing, was tracked in a detailed schedule. This provided full transparency into task assignments, timelines, and potential risks.
How to Make a Project Schedule in Simple Steps
Over the years, I’ve learned that while your tools might vary, the approach to building an effective schedule remains consistent. Let me walk you through the step-by-step process of how I typically approach making a project schedule.
Step 1: Define Scope & Objectives
Before you think about timelines and tasks, here’s something more important to figure out –
- What exactly are you trying to achieve?
- What are the boundaries of your project?
- What are the must-haves versus the nice-to-haves?
Any ambiguity here will almost certainly result in scheduling issues later. I remember leading a marketing campaign where we dove headfirst into scheduling without fully defining the campaign’s goals. The result?
We ended up with a working schedule for a campaign that wasn’t aligned with our overall marketing strategy. Hence, defining the project scope and overall objectives is a must.
Step 2: Identify Key Tasks & Activities
Once the scope is defined, the next step is to break it down into specific tasks or activities.
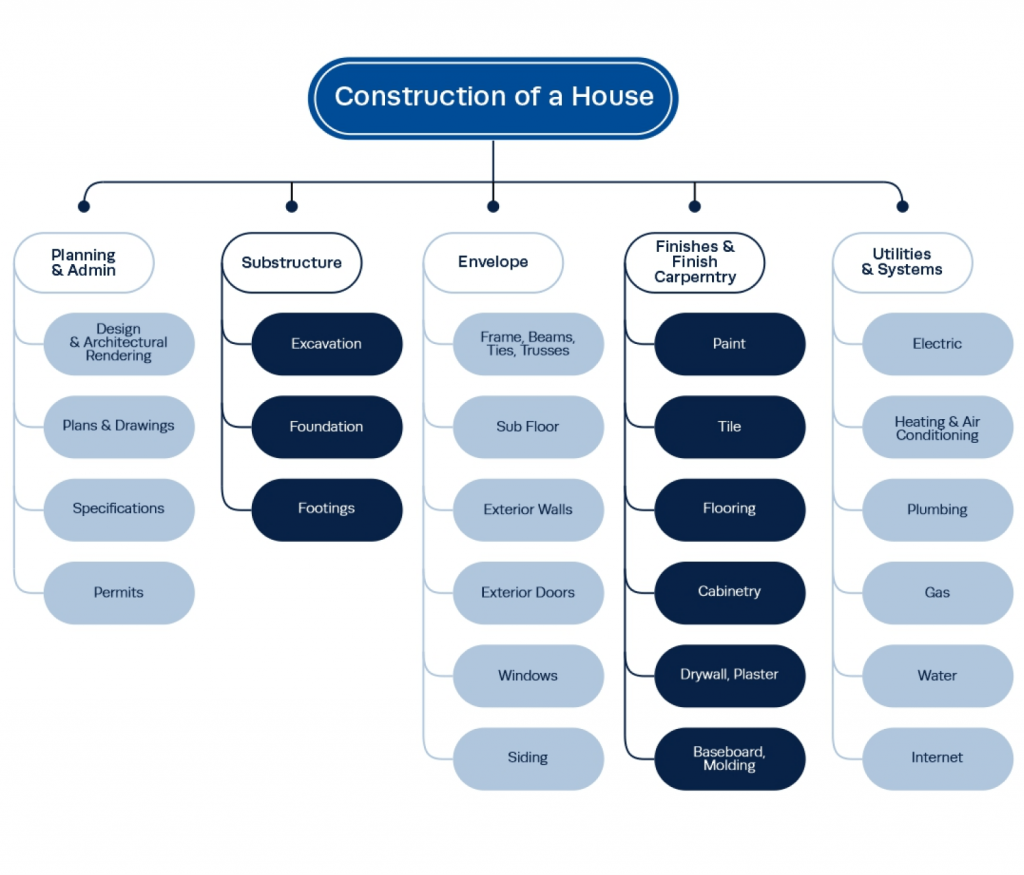
This process, known as work breakdown structure (WBS), helps to disintegrate the project into smaller, manageable pieces.
Here’s how a WBS may look for a construction project –
Here’s a step-by-step breakdown of what you need to do here –
- Define the tasks and set the sequence between them.
- Define task dependencies and develop a clear path for project execution.
- Mark tasks that you can carry out parallelly.
- Delegate tasks to team members and see work progress across different tasks simultaneously.
Let’s say you’re managing a product launch. You’d start with high-level tasks like “Market Research” or “Product Development” and then break them down into more specific activities like “Conduct surveys,” “Develop prototypes,” etc.
Step 4: Estimate Resources & Duration
Once you outline the tasks and dependencies, you must estimate how long each task will take and what resources (people, tools, materials) are required.
Accuracy here is critical. It’s also important to factor in contingencies for tasks that are prone to delays.
For example, in a software project, I might estimate that writing code for a feature will take two weeks based on past experience, but I always leave buffer time for testing and debugging. This helps you avoid last-minute rushes and keep everyone sane.
Step 5: Set Milestones & Assign Resources
Milestones are the key events or checkpoints within your project. They help you mark significant progress points and keep the team focused on the big picture.
Now that you know the tasks, durations, milestones, and dependencies, it’s time to assign resources. This is where team capacity comes into play.
Proper resource allocation ensures that no one is overburdened and that tasks are completed efficiently.
? Pro Tip: Do you often find managing project resources a mess? A resource planning tool can help you overcome that and optimize resource management. Not sure about what it does?
Step 6: Create the Schedule
It’s time to assemble all the information into a cohesive schedule.
Now, some prefer the more convenient use of project management software like ProProfs Project or Microsoft Project. Others may still prefer old-school spreadsheets.
Regardless, the aim remains the same: create a visual representation of the tasks, their sequence, durations, dependencies, and assigned resources.
I’ve tried both ways. Here’s what I think –
When I’ve used tools like Gantt charts, I’ve found them incredibly useful because they clearly let me see task overlaps, adjust timelines, and spot potential issues ahead of time. You can also track progress against the schedule easily.
How to Manage Project Schedule During Execution
So, did you think getting the project schedule format right was the last step in project scheduling?
That’s precisely what I used to believe before unexpected changes and challenges (deviations, delays, resource constraints, etc.) started appearing out of the blue.
Initially, I thought that creating a precise schedule would prevent these. But over time, I realized that it was not possible. You just need to be ready when hitting the execution phase. How?
Here are some recommendations –
1. Monitor Progress Like a Hawk
I remember a software development project where we noticed a key task, “Integrate payment gateway,” was falling behind schedule. The team identified the root cause of the delay. It was discovered that the developers were encountering unexpected challenges with the API.
But why should this matter to you?
Well, I wanted to emphasize the necessity of closely monitoring each task’s progress against the scheduled timeline. This includes keeping tabs on task completion rates, resource utilization, and potential delays.
While I find Gantt charts the most useful here, I’ve seen some colleagues prefer Kanban boards. It depends on what you find more convenient.
2. Navigate Deviations by Updating the Schedule Regularly
Adjusting timelines in real-time is crucial, whether to accommodate unexpected delays, add new tasks, or reallocate resources. Failing to update the schedule can lead to more significant problems, as outdated information may give a false sense of progress.
Here are some of the best suggestions you can try –
- Reallocate resources: If one task is lagging, see if you can shift resources from a less critical task to expedite it.
- Adjust deadlines: If a delay is unavoidable, negotiate a revised deadline without jeopardizing the overall project objectives.
- Re-sequence tasks: You can re-order tasks to accommodate delays and maintain momentum.
Making such small changes ensures you avoid a significant delay in the overall project delivery.
3. Communicate Clearly & Often
Something that most websites don’t tell you when googling “multi-project management tips” is that clear communication is non-negotiable.
Now, communication when managing projects is possible through two distinct ways. For instance –
- You can migrate to a communication platform like Microsoft Teams, Slack, Skype, Zoom, etc.
- But if you’re not fond of investing in separate software or switching between multiple platforms, look for project collaboration software.
ProProfs Project is one such example.
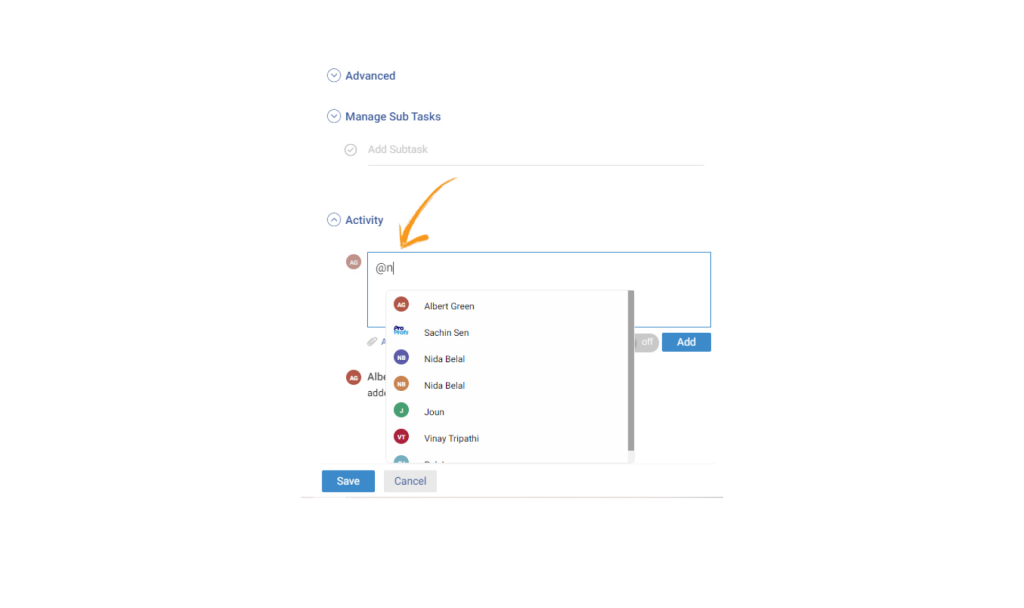
You can conduct regular status discussions through chats, share files and updates, discuss challenges, tag users, add task comments, etc. These tools cover startups’ and small teams’ most basic communication/collaboration requirements.
4. Handle Scope Changes With Caution
One of the most frequent reasons schedules fall apart is scope changes during the project execution phase.
Managing this well requires balancing flexibility and maintaining the integrity of the original plan. When a scope change is requested, I recommend assessing its impact on the schedule, resources, and overall timeline before making adjustments. This way, you can avoid the consequences of scope creep.
5. Monitor Team Performance & Morale
It’s important to monitor your team’s well-being during the execution phase. Low morale or burnout can slow progress.
If you notice the team showing signs of burnout as the deadlines approach, organize a few informal meetings and adjust tight deadlines where possible. This will likely boost morale and maintain the schedule without overburdening the team.
What Are the Most Common Project Scheduling Techniques?
Project scheduling techniques are essential tools for managing timelines, allocating resources, and ensuring tasks are completed within due time.
Below, I’ve outlined some of the most common project scheduling techniques that have proven invaluable in small- and large-scale projects.
1. Gantt Charts
If you want to visualize the project schedule at a glance, Gantt charts should be your go-to tool.
I often rely on Gantt charts to outline project tasks, deadlines, and dependencies. These handy charts display tasks as horizontal bars on a timeline, giving you a clear picture of –
- Task durations: The length of each bar represents how long a task is expected to take.
- Task dependencies: Arrows between bars show which tasks must be completed before others can start.
- Overlapping tasks: You can easily see which tasks can be done concurrently.
- Project milestones: Key achievements or deliverables are marked on the timeline.
The primary benefit of using a Gantt chart tool is its simplicity and clarity.
I remember working on a complex project a few months ago, where over 50 tasks were running in parallel.
Without the Gantt chart, tracking task dependencies and resource allocation would’ve been a nightmare. It helped us manage all the moving parts—design, development, content creation, testing—and ensure everything was progressing as planned.
2. Critical Path Method (CPM)
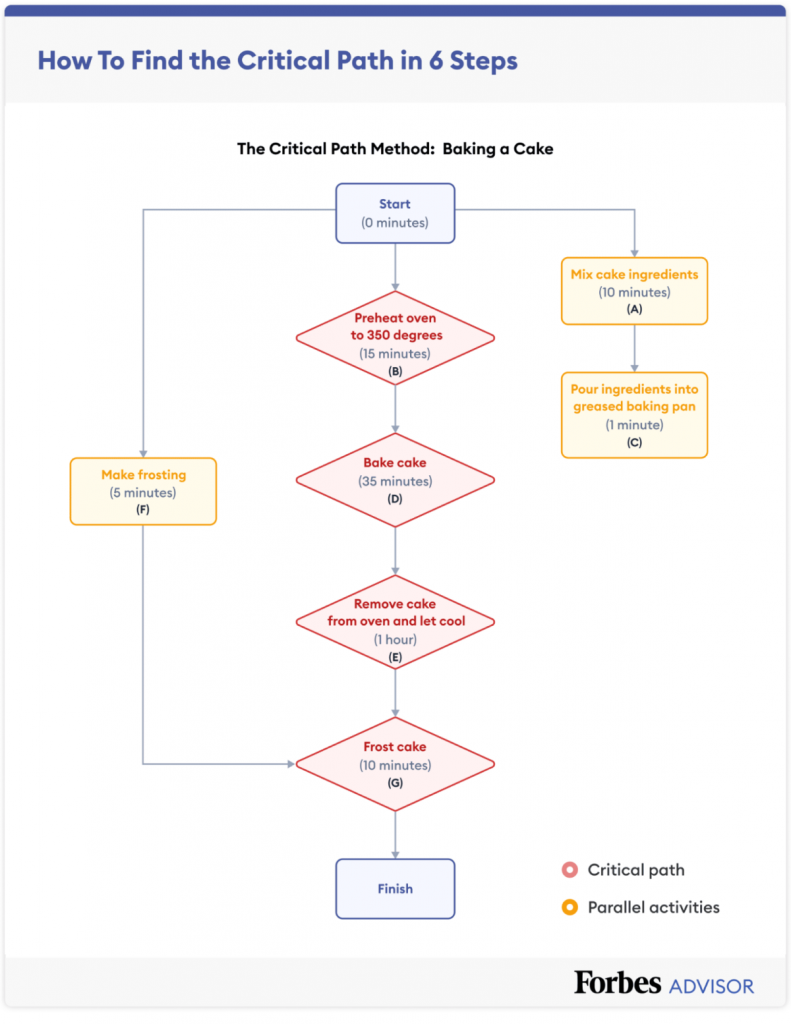
The Critical Path Method is a more analytical approach focusing on identifying the longest sequence of dependent tasks, or the “critical path.”
Any delay in critical path activities directly impacts the project’s end date. In my experience, CPM is useful for larger, more complex projects with interconnected multiple tasks. It allows you to zero in on the most crucial activities, ensuring they are completed on time to avoid delays in the overall project.
CPM is easily one of the best project management techniques, whether you’re baking a cake (literally!) or working on a manufacturing project.
Let’s assume you’re baking a cake (why not). This is how the CPM will look like –
3. Program Evaluation & Review Technique (PERT)
PERT is used to estimate project duration when task completion times are uncertain. It involves calculating three time estimates for each task—optimistic, pessimistic, and most likely—and then using these to derive an average expected completion time.
- Optimistic time: The shortest possible time to complete the task.
- Pessimistic time: The longest possible time.
- Most likely time: The most realistic estimate.
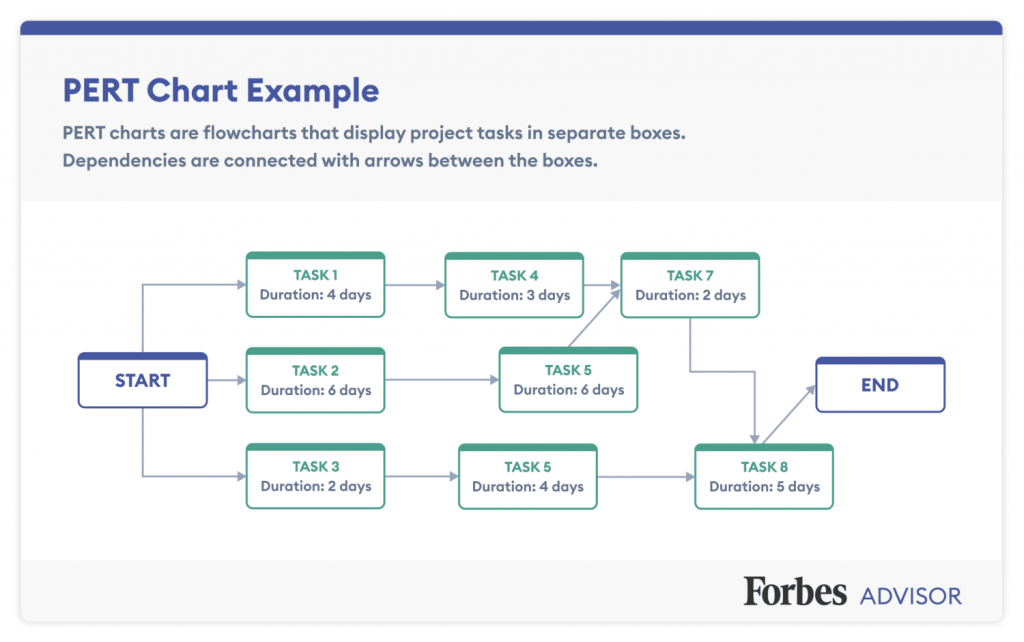
This technique is especially useful when managing projects with many unknowns, such as new product development, where historical data may not be available.
PERT provides a more realistic picture of project timelines by accounting for best and worst-case scenarios. This should help avoid overly optimistic schedules that could lead to missed deadlines.
4. Milestone Charts
Milestone charts are simpler than Gantt charts and focus only on key points or significant events in the project timeline, such as project kick-offs, approvals, deliverables, etc.
So, why do you need to use these?
Well, these help you summarize progress for stakeholders who may not be interested in knowing the nitty-gritty of every task but want an overview of major achievements.
5. Resource-Oriented Scheduling
Resource-oriented scheduling focuses on how project resources—whether team members, equipment, or materials—are allocated over time.
This technique helps ensure that resources are not overcommitted and are available when needed. It’s particularly useful in projects where the availability of key personnel or equipment is limited.
For instance, we had only one senior developer available for a critical task in one project. So, we built the schedule around their availability to avoid delays. Without resource-oriented scheduling, we could have overallocated resources, causing delays.
6. Kanban Boards
Kanban boards visually represent work progress and workflows by categorizing tasks into columns such as “To Do,” “In Progress,” and “Done.”
This is a more agile scheduling technique is effective for projects requiring continuous task management rather than adhering to a rigid timeline.
The flexibility of Kanban boards is perfect for software development projects where tasks constantly change and evolve. You can easily adapt to new requirements without completely overhauling the project schedule.
What Are Project Scheduling Tools?
Project scheduling tools are software applications designed to help you plan, organize, track, and manage project timelines, tasks, resources, and deliverables.
Some of you may ask – So, are these just digital calendars?
No, not really. These tools are integral to the overall management process. The right tool can save time, reduce human error, and provide clear visibility into every project stage.
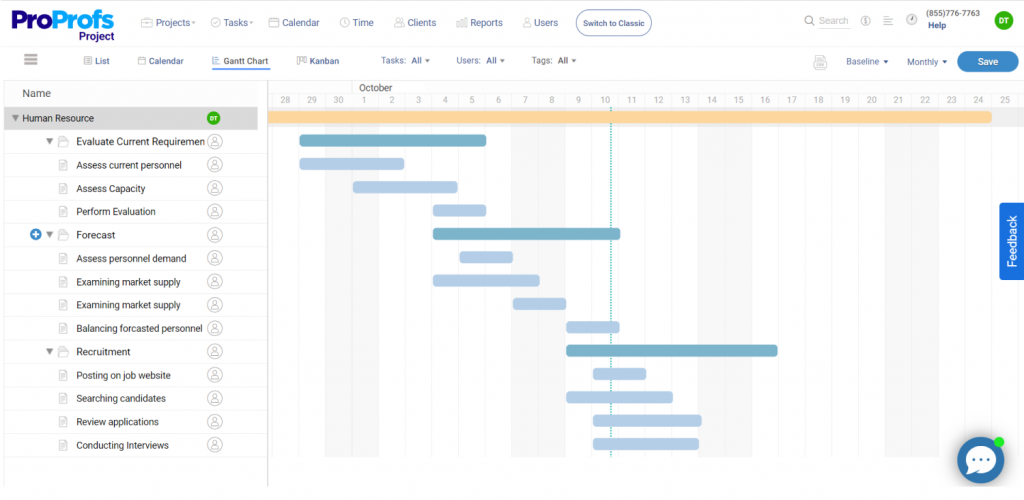
See how this Gantt chart provides clear visibility into the different stages of a human resource project.
What Features to Look for in Project Scheduling Software?
Identifying the features that will truly support your team’s needs and help ensure successful project outcomes is important.
While every tool offers a unique set of functionalities, key features can make a real difference in how effectively you can plan, manage, and execute a project.
Let’s have a quick look at the core functionalities project management scheduling software should offer –
- Gantt charts: These are best for getting a visual representation of your project timeline. Gantt charts show the duration of tasks, their start and end dates, and any overlapping or dependent activities.
- Task management: Effective task management includes assigning tasks to team members, setting deadlines, and tracking progress. Subtask management is equally critical, as it helps track the completion of smaller steps within larger tasks.
- Resource allocation: Scheduling software should allow you to assign resources (such as team members, equipment, or materials) to tasks. It’s even better if the tool can track how much of each resource is available and forecast potential shortages.
- Collaboration features: Integrated features like messaging, file-sharing, setting up teams, task comments, real-time updates, etc., allow you to collaborate without relying on third-party platforms.
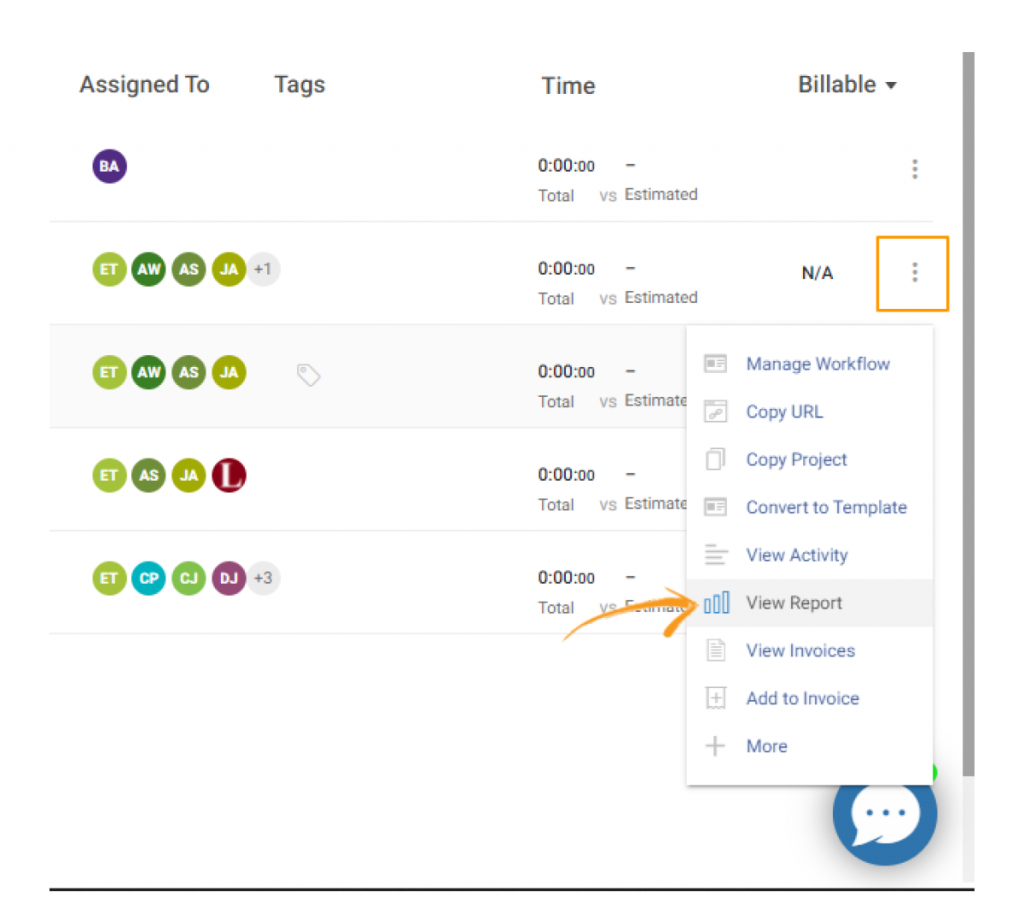
- Progress tracking & reporting: Being able to track how far along tasks are—and whether they are on schedule—is vital. Ensure the software offers real-time progress updates and has detailed reporting capabilities.
What Are the Benefits of Project Scheduling in Project Management?
I believe you already have a faint idea of how a well-planned project schedule can benefit. Here’s a quick recap –
- Hit deadlines consistently: A clear schedule helps you set realistic deadlines, track progress, and ensure timely project completion.
- Prevent scope creep: A defined schedule helps prevent scope creep by clearly outlining the project’s boundaries and deliverables.
- Optimize resource overloads: Allocate resources effectively and prevent overloads to maximize team productivity.
- Make informed decisions: Track progress, analyze actual versus planned durations, and identify trends to make informed decisions.
- Boost team morale: A well-managed schedule minimizes uncertainty, prevents last-minute rushes, and creates a calmer work environment.
Drive Projects to Success With Robust Project Scheduling Software
By now, you must have figured out a project schedule, its benefits, how to create one, and so on. But, what remains the most important factor to consider is choosing a project scheduler.
Before you go haywire, here’s a software platform you can use to get started – ProProfs Project. And before you go ask “why,” here are some quick reasons –
- You can instantly start creating project schedules without paying a penny, thanks to a free plan.
- The software comes with a free project schedule template to save you from the hassle of starting from scratch.
- In my experience, the UI is pretty straightforward, even for non-technical people (like me, haha).
I believe that’s pretty much enough information you should know before trying out the tool. The rest of the stuff, like collaboration features, reports, automation, etc…you can figure out as you explore more.
So, what are you waiting for? Ready to create a well-planned schedule that will help you keep clients for the long run?
FREE. All Features. FOREVER!
Try our Forever FREE account with all premium features!
